Wednesday 10 April 2013

hanging succulent garden

I found this wine bottle case at an op shop months back, never sure what i was going to do with it but sure one day soon an idea would hatch. Today was the day :)

I have a succulent garden out back that is old Totora battens made in to a frame, meshed and filled with sphagnum moss. This is my variation on the same idea as I had no sphagnum.


I bent pieces of the wire to make holes for the cuttings to fit through, be careful not to pull the mesh away from the frame. You need to be gentle.


Next , line the inside of the box with newpaper, fill with potting mix and water well. you want it very full but not so it will bulge out.


cover the top layer with more newspaper and wet again. Close the lid, I used small tack nails to lock the front in to place so it wont pop open.
Poke holes with a skewer and poke in succulent pieces, get them as far in to the soil as you can so they will root well. I found pieces with small roots starting wherever possible.
Plant more than you need as some might not take.


Leave it under a tree or some place shady for a month or so, gently tug to see if the roots are well planted.Given time the whole mesh front and side will cover in giving you a nice piece to hang on a fence or outdoor wall. The root systems hopefully will hold the remaining soil in place as the paper breaks down.

Pull it down periodically for a really good watering during the summer and sprinkle or water in a little fertilizer. 


Saturday 2 March 2013

Extreme recycling

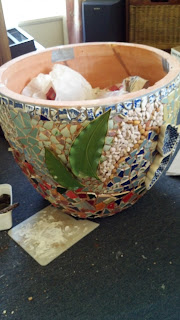
Just to prove that there are a lot of things that would end up as landfill that do not need to, I set myself an extreme recycling mission. I was delivered this box of pieces that was once a beautiful big expensive pot.There are loads more small pieces than shown here, but you get the idea.

So I stared at the pile for days and days.....scratched my head, picked up pieces and wondered...the pic above was part of the wondering stage.

DUCT TAPE AND NO MORE NAILS.


What can't you fix with those two items? And so it began...

It took many many days of joining piece by piece, waiting for the bits to bond but I got there.

Then came the collection of broken and damaged china, a few trips to the local op shops for more treasure, eventually i had to concede and buy a few tiles, or I would have had to wait weeks or months to have enough goodies to complete the task.


Finally I had it covered. Time to grout... groan,


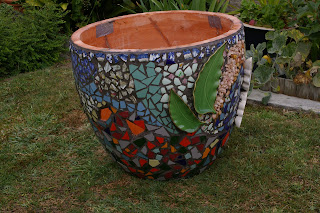
After hours of scrubbing and scraping, it is finished. Well aside from filling it and planting it !!
One less item in landfill that will be there for hundreds/thousands of years !

Besides all of that, the satisfaction and enjoyment of creating it and the years of enjoyment to come .. well you just can't put a price on that :)


Thursday 29 November 2012

A little preoccupied right now.

We are trying to win a home deposit. My Dad passed away last month and we want to be able to keep his little home. If you could, please vote "keeping dad's home" on the competition page . every vote is precious. Comp ends this Sunday :)


Here is the link : https://apps.facebook.com/offerpop/Contest.psp?c=223280&u=59409&a=254553244581393&p=162447170489862&v=Entry&id=668199&rest=1

thanks so very much. Back to creative stuff once this is over.

Saturday 8 September 2012

Home made crackers

I found a recipe years ago for home made crackers. The basic recipe is as follows.

WHOLEMEAL CRACKERS

2 cups wholemeal flour
1 2/2 tsp baking powder
50g very cold water
1/2 c butter
1/4 c sesame seedss ( optional)
2 Tbsp grated parmesan
salt to taste.

Place all ingredients in the processor other than the water. Process until the ingredients are blended. Add the water in a steady stream, stopping when it forms a dough.
Roll out thinly on a floured board then cut in to squares.Pile dough scraps on top of each other, then roll out again. ( do not push together to form a ball).
Bake at 190 0c (375 of for 10- 15 minutes.

As I am a flavor freak and loath following the rules, I use the measurements above and then add all kinds of things. Chopped garlic, feta,tasty cheese , fresh thyme, oregano, sometimes basil and sun-dried tomato, a pinch of curry powder or chilli, Moroccan seasonings, chicken stock, smoked paprika.. what ever takes my fancy at the time.

So long as you roll them really thin, just a few mm thick, prick them with a fork, turn them half way through baking. You can't really go wrong.you can tell when they are totally cooked when there is no resistance in the middle of each cracker. Remember you want crunch when they have cooled.

Here are some images of this mornings batch.


Saturday 1 September 2012

Random acts of kindness

Today a friend received a lovely jar of home baking in her mailbox. A random act of kindness and a wonderful thoughtful gift. It has cheered her day so very much, that I thought I just might make some random acts of kindness cards that anyone can print and use when they just feeling like making somebodies day ! Could be a stranger, a friend who needs cheering up, could be whom ever you choose :)

There are endless possibilities, perhaps pop in a petrol voucher, pay for someones coffee behind you in a cue, an act of kindness is not about what it costs, it is leaving the gift of a smile on someone else's face and in their heart. Print and cut out the a4 file, you can pop them in an envelope, print them on card stock, pop a hole in the top corner and tie them to some flowers or a jar of home baking......

feel free to print them and use them, as many as you like and as often as you like. I DARE YOU TO :)

Here is the link for the large printable file.. I hope this works ! It is the first attempt at file sharing lol.


A4 Printable version


Sunday 19 August 2012

Still addicted to vintage

This weekend when I was trolling my garage for things to play with, I found some demensional frames I had purchased cheaply years ago. This is what I did with them. The first image is the first one in progress, the other images are the finished frames.
So much fun with a printer, some varnish and a few buttons.


Tuesday 7 August 2012

Recycled gift box

I made this for a friend this morning. After digging in my wardrobe box collection !!


 Disassemble the box, use double sided tape to adhere your paper. Make sure to apply the tap where the joins fold as well to stop the paper from bubbling up and not sitting flat. Keep the tape as close to the edges as you can so they wont lift once the box is assembled.Trim around the paper with a scarp craft knife.

I lined the inside also with a contrasting paper.


Once the box is assembled, start playing with it. I used one of my copic designed 3d teddies, peelcraft and foam dots were used to elevate some of the pieces and give it dimension.
The peelcraft hearts and bow were placed on to the contrasting papers and cut out before adding them.


I adore the teeny holographic peelcraft circles. They shine like little diamonds :)


So there you go. A simple little box, recycled that will hopefully be kept as a little treasure for years to come. This one was filled with hand made jewelery for a friends sister.